
- Updated on
Architecture Render Prompts: A Practical Guide for Architects
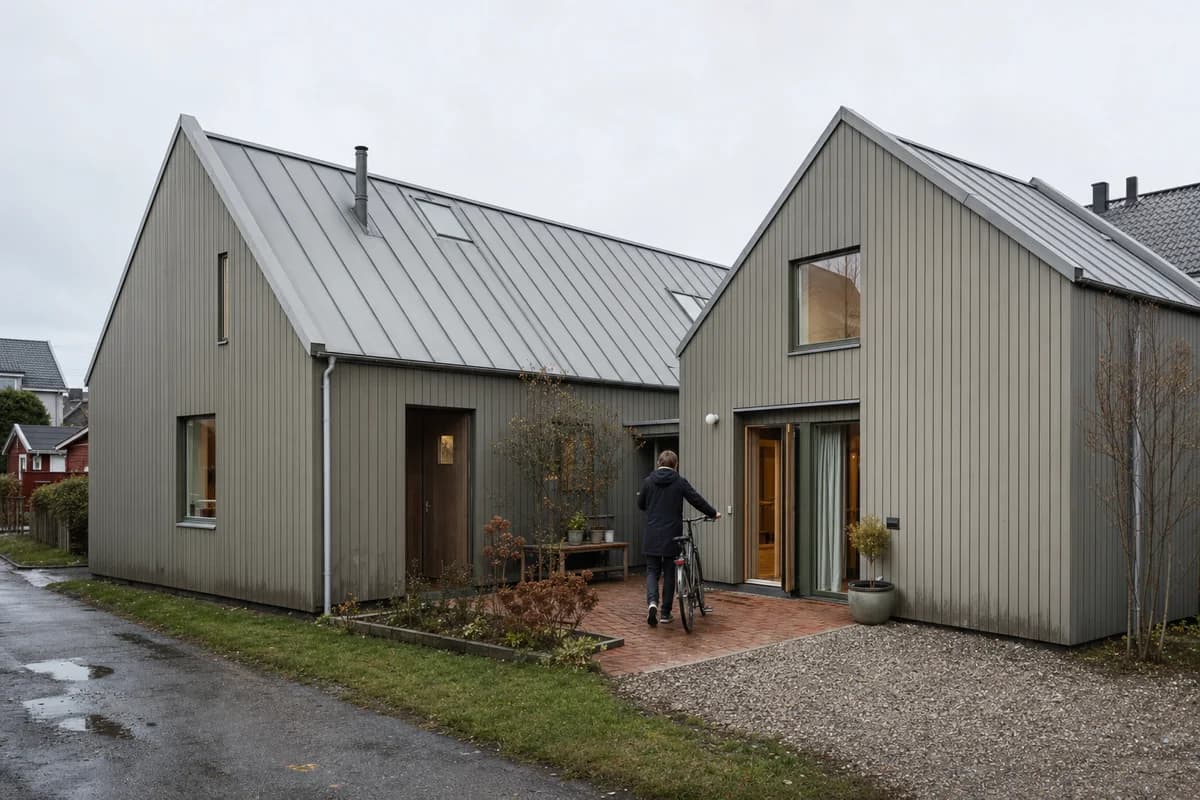
A good architecture render prompt is a short visual brief. It names the space, architectural direction, materials, context, light, camera, activity, and constraints. Specific physical decisions matter more than length. Write "rain-darkened brick with dull zinc flashing" instead of "beautiful modern materials."
The source image changes the job. A text-only prompt must establish the building and view. A prompt used with a screenshot, sketch, plan, or aerial should protect what the source already fixes and describe only what must change.
What makes a useful architecture render prompt?
A useful prompt gives the image model decisions it can show. It does not ask the model to solve the project.
Use this order:
- Task and subject. Name the image and the building or space.
- Direction. Describe the tectonic and material character.
- Materials. Name surfaces, joints, finish, age, and weathering.
- Context. Set the street, landscape, climate, or neighboring fabric.
- Light. Choose time, direction, weather, and contrast.
- Camera. Set viewpoint, framing, and perspective character.
- Activity. Say who uses the space and what they are doing.
- Constraints. State what stays fixed and what must remain absent.
Prompt anatomy
Select a phrase to see the decision it controls.
Subject
The building, room or architectural task.
- Subject
- A four-storey civic library. The building, room or architectural task.
- Direction
- Durable brick loggias and deep public thresholds. The material and tectonic design language.
- Materials
- Dark fired brick, architectural precast, oak handrails. Specific surfaces, joints, wear and finish.
- Context
- An ordinary mixed-use town center after rain. The street, landscape, climate or neighboring fabric.
- Light
- Soft post-rain overcast. Time, direction, weather and contrast.
- Camera
- Eye-level 35mm view with straight verticals. Viewpoint, framing and compositional character.
- Activity
- Readers arriving by foot and bicycle. People, action, density and captured motion.
- Constraints
- Keep access routes clear. No logos or invented signs.. What must stay fixed or remain absent.
This sequence is a checklist, not a syntax rule. Drop a part when it adds nothing. Repeat a constraint when a source image must remain fixed.
Use the free Architecture Render Prompt Builder to assemble one editable brief from the subject and the five Project fields. The guided draft runs in the browser and leaves empty fields out. A signed-in final step can refine the completed wording with AI.
How specific should the prompt be?
Be specific about visible facts. Avoid long lists of adjectives.
Weak:
A beautiful luxury house in a Nordic style, cinematic, ultra-real.
Stronger:
Create an eye-level exterior of a compact courtyard house at a Nordic town edge. Use mineral-painted timber, fired brick, dull zinc roofs, and deep oak-lined thresholds. Set high overcast daylight over a wet gravel lane. Show one resident wheeling a bicycle toward the entrance. Keep joints, drainage, roof thickness, and weathering visually plausible. No staged car or pristine timber showroom.
The stronger brief gives the model architecture, climate, occupation, and limits. It does not rely on "luxury" or "ultra-real" to carry the image.
Browse the professional architecture prompt directory to compare 570+ complete examples.
How do materials and light work together?
Materials need light that reveals their behavior.
- Raking sun shows board-form texture and deep reveals.
- High overcast light keeps brick, timber, and landscape color honest.
- North light suits interiors where material comparison matters.
- Dusk works when interior occupation and entrance light are part of the brief.
- Rain changes asphalt, stone, metal, timber, reflections, and drainage.
Avoid asking for every effect at once. Golden hour, rain, fog, dramatic shadow, and bright interiors create competing instructions. Choose the condition that supports the review decision.
For material realism, name finish and use:
- honed limestone with softened edges;
- mineral-painted timber with rain-darkened lower boards;
- galvanized steel with handling marks;
- reused brick with mixed batches and lime repair;
- glass with restrained reflections and slight waviness;
- terrazzo with scuffed circulation paths.
Use the realistic material briefing and review method for complete concrete, timber, glass, and brick instructions with pass and reject checks.
How should architects describe the camera?
Camera language controls the read of the project. Use it as composition guidance, not an exact optical simulation.
- Eye level: ordinary approach, entrances, public use.
- Three-quarter view: massing, depth, and facade transitions.
- Straight-on view: elevations, rhythm, and public frontage.
- Aerial oblique: block structure, landscape, and neighboring context.
- Top down: plans, sites, and masterplans.
- Longer lens character: flatter depth and quieter material studies.
- Wider lens character: interior relationships and public-realm activity.
Always state what must fit in frame. "Full building visible" is often more useful than an exact lens number.
How do people make a render feel inhabited?
People should explain space. Give them ordinary actions and clear destinations.
Good activity language:
- one resident wheels a bicycle toward the entrance;
- readers cross the forecourt while two people wait under the loggia;
- staff pin drawings as visitors inspect material samples;
- commuters transfer between a stopped bus and an arriving tram;
- children draw with chalk while adults carry groceries through the shared court.
Keep the architecture primary. Large exact counts can make the prompt brittle. For busy scenes, set the density and name two or three anchor actions.
People should be synthetic and non-identifiable. Avoid repeated faces, portrait-first framing, demographic stereotypes, and implausible circulation.
How do I prompt motion without blurring the building?
Name what moves and what remains sharp.
Rain streaks, bicycle wheels, coat hems, and the nearest walking legs may show restrained directional blur. The facade, canopy, paving joints, tactile route, drainage slots, and stopped vehicle remain sharp.
Motion can come from people, transit, traffic, water, foliage, fabric, snow, or light trails. It should support the architectural story. Do not use blur to hide weak geometry or malformed people.
What creates ultra-real architectural photography?
Ultra-realism comes from physical consistency and traces of use:
- sealant joints, flashings, downpipes, thresholds, and drainage;
- batch variation, repairs, dust, scuffs, fingerprints, and uneven aging;
- plausible reflections and restrained dynamic range;
- ordinary neighboring fabric and service access;
- natural clutter that belongs to the program;
- people acting rather than posing.
Do not add renderer names, "8K," "masterpiece," or heavy lens effects. These words do not replace architectural detail.
How do prompts change when I use a source image?
Start with a preservation clause.
For a 3D screenshot:
Preserve all source geometry, camera position, crop, floor count, openings, roofline, and object positions exactly. Change only materials, light, landscape treatment, weather, and occupation.
For a plan or map where new content is added:
Preserve the source viewpoint and all existing roads, paths, water, contours, retained buildings, and boundaries. Add only the specified buildings and landscape within the identified vacant areas.
Do not preserve a flat plan camera and then ask for an oblique perspective. Choose one coherent projection. In CAD Scene, source-assisted prompts open in Enhance and still require your own source image. Read how Enhance uses a source image.
Google Maps imagery is not supplied by this directory. Use fictional, owned, or properly licensed site imagery.
What should stay outside the prompt?
Leave out:
- instructions the source image already fixes;
- contradictory times, weather, or camera positions;
- copied architect names;
- quality-token filler;
- logos and brand names;
- technical approval claims;
- long negative lists unrelated to the image.
Generated plans, sections, crowds, access routes, and construction details can support visual review. They do not verify code, accessibility, planning, engineering, operations, or construction.
A practical iteration method
- Start with one complete prompt.
- Review subject and camera before surface detail.
- Check structure, openings, scale, and circulation.
- Change one outcome-changing variable.
- Keep the rest of the prompt fixed.
- Compare the outputs at the same size.
- Save durable direction in the Project Composition.
Use the prompt for the current view. Use CAD Scene's Style, Scene, Lighting, Materials, and Entourage fields for decisions that should continue across studies. See Composition and the five fields.
Table of Contents
- What makes a useful architecture render prompt?
- How specific should the prompt be?
- How do materials and light work together?
- How should architects describe the camera?
- How do people make a render feel inhabited?
- How do I prompt motion without blurring the building?
- What creates ultra-real architectural photography?
- How do prompts change when I use a source image?
- What should stay outside the prompt?
- A practical iteration method
Authors

- Name
- Vladimir Mindru
Previous Article
Table of Contents
- What makes a useful architecture render prompt?
- How specific should the prompt be?
- How do materials and light work together?
- How should architects describe the camera?
- How do people make a render feel inhabited?
- How do I prompt motion without blurring the building?
- What creates ultra-real architectural photography?
- How do prompts change when I use a source image?
- What should stay outside the prompt?
- A practical iteration method
Authors
- Name
- Vladimir Mindru